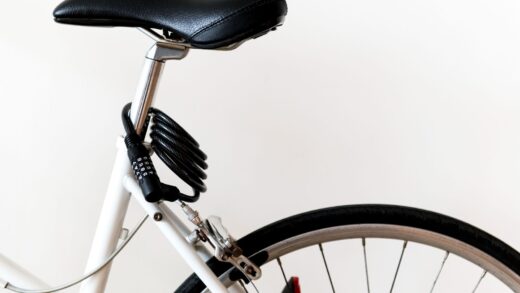
Navigating the world of cycling, riders often face challenges with their equipment. One such common challenge is the sudden slippage or misalignment of the bicycle chain.
A thorough understanding of the underlying causes and effective preventive measures can make for safer and more enjoyable rides.
How to Address a Slipping Bicycle Chain Issue
For every cycling enthusiast, the sudden mishap of a bicycle chain misaligning or even slipping out of place during a gear transition is a familiar scenario. It’s not just irksome; it can potentially disrupt a peaceful ride.
Often termed as “chain slip,” this issue is nearly unavoidable for most riders. Knowing the root causes and potential solutions becomes vital to ensure every ride is smooth and devoid of such interruptions.
Is a chain replacement the only solution? What are the best practices to mitigate a slipping chain? This comprehensive guide sheds light on why bicycle chains slip and offers insights to prevent recurrent episodes.
Understanding Chain Slip: A Deep Dive
A recurring chain slip is a concern that plagues many cyclists. While it’s easy to dismiss this as mere oversight, several underlying factors can cause such disruptions. From a cyclist’s perspective, understanding these factors can mean the difference between replacing a chain and a simple tweak.
Diagnosing the Chain Slip Syndrome
Recognizing a slipping chain isn’t just about the obvious misalignment. One of the primary symptoms includes an audible clicking sound when attempting gear transitions. Additionally, a distinct resistance might be felt when pedaling.
A practical diagnostic approach is to cycle uphill on a mid-range gear, paying attention to any unusual noises that suggest multiple shifts or slips. Further gear changes can help isolate the issue.
Inspecting the chain segments close to the gear cogs is also crucial. Any signs of excessive wear or fraying hint at frequent slips, indicating a potential need for chain replacement.
Why Do Bicycle Chains Slip? An Insight
Several reasons can cause a bicycle chain to misalign or slip:
Chain Tension Discrepancies: An over-tightened or too-slack chain can veer off the gear sprockets during transitions:
- Gritty or Dehydrated Chain: Accumulated grime can obstruct seamless shifts. Ensuring regular lubrication of the drivetrain aids in efficient functioning. Persistent issues might require a closer look at the drivetrain components or the need for a chain replacement;
- Excessive Chain Usage: An extensively used chain might not mesh well with gear teeth, leading to slips. Regular inspection and timely replacements can preclude premature wear;
- Misaligned Derailleur: The derailleur, if misshapen due to constant shifting pressures or collisions, can hamper fluid gear transitions, making the cycle more susceptible to chain slips;
- Inappropriate Gear Proportions: Unsuitable gear ratios can plague even the seasoned cyclist. This can result in challenges like maintaining optimum speeds on even terrains. Establishing an ideal gear ratio requires factoring in individual cycling habits, terrains, and physical endurance. For tailored advice, consulting a seasoned cyclist or a reputable bicycle store is prudent.
Spotting and Understanding Chain Slip Symptoms
It’s pivotal to recognize chain slip symptoms promptly. The most telltale sign is a chain that feels unsecured when pedaling begins. This arises from improper regulation, causing the chain to dip excessively during cycling. A discernible power reduction during gear shifts further confirms chain slip.
Aside from these evident signs, listening to your bicycle during gear shifts is beneficial. A distinct clatter, typically emerging after prolonged chain usage, indicates chain misalignment or frequent slippage.
Inspecting Derailleur Components for Chain Slippage Issues
If your bicycle employs derailleurs for gear changes, it’s essential to inspect for components that might be out of alignment or missing. Misalignments or absences can be a major contributor to chain mishaps.
Should these components appear misaligned or out of order, consulting a seasoned mechanic or making alterations independently (if one is adept) might be beneficial.
Optimizing Front Derailleur Settings to Minimize Chain Mishaps
For those grappling with persistent chain mishaps during rides, ensuring the front derailleur’s optimal setting can be a game-changer. This device orchestrates the movement of the chain across various gears. If it’s not calibrated correctly, the chain may misbehave.
Steps to enhance front derailleur settings include:
- Align the chain with the largest cog upfront and the most expansive sprocket at the back;
- Secure the limit screws on the derailleur’s sides ensuring it doesn’t overshoot or retract excessively during gear transitions;
- If a suitable barrel adjuster is available, tweak it minutely until a subtle click is audible;
- While transitioning gears, exert consistent pressure till a clear click is heard, then cease pressure for maximum efficiency.
Mountain Bicycle’s Gear Transition Hiccups
Navigating mountain terrains on a bicycle can be a thrilling venture but comes with its technical hitches.
A frequent hiccup is the unpredictable gear transition, causing cyclists to lose their flow and stability. Such issues can arise from slack chains or a compromised derailleur hanger, disrupting the rear derailleur’s alignment, and making the chain behave erratically.
Addressing this involves:
- Evaluating your mountain bicycle chain’s tension. Modify by tweaking the rear axle to fine-tune the tension;
- If wear and tear are evident on the chain, consider replacing it;
- Examine the rear derailleur hanger. Should it show signs of damage, it may require replacement.
On occasion, gear hitches stem from an aged cassette, necessitating its replacement. This requires a cassette removal instrument to displace the older cassette and position a fresh one. Maintaining your bicycle can mitigate many of these technical setbacks, ensuring seamless trail rides.
Optimal Chain Lubrication Practices to Curtail Slippage
Should your bicycle chain experience erratic movements, lubrication might be the solution. A well-oiled chain ensures reduced friction and seamless transitions.
Steps to optimize chain lubrication:
- Initiate by cleaning the chain and ridding it of dirt and debris;
- Use a brush to dislodge stubborn dirt between links;
- Administer chain lubricant, focusing on inner portions of the chain segments;
- Rotate pedals, simultaneously wiping off excess lubricant using a lint-free cloth;
- Assess the gears for smooth transitions, ensuring no erratic chain movements;
- If issues persist, revisit the above steps.
Approaches to Address Chain Misalignment
Encountering chain slippage? Here are methods to resolve it:
- Evaluate Shifting Habits: Often, improper shifting habits can be the root cause of chain slippage. Ensuring consistent pressure when shifting and allowing the shifter to return to its original position ensures seamless gear changes;
- Tweaking Limit Screws: If derailleur limit screws aren’t set correctly, it can cause erratic chain movements. You can realign them personally using a simple tool or seek expertise from a local bicycle store.
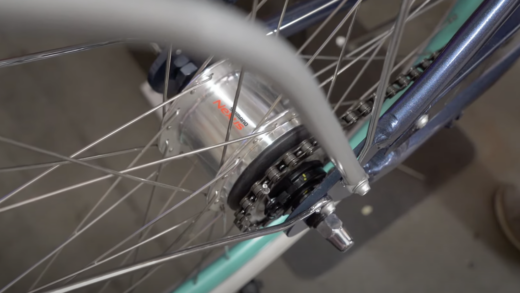
Damaged or Worn Sprocket Teeth
One factor leading to cycling equipment misalignment could be deteriorated or compromised sprocket teeth, hindering the proper interaction between the cog and the linkage. Proactively replacing them can protect integral parts of the transmission system such as gear-changing devices and shifting mechanisms.
Chain Lubrication
Neglecting the lubrication of the cycle’s linkage might lead to it jumping over cogs because of heightened friction between its components and with other elements of the transmission system, including the gears. It’s advisable to apply a lubricating solution like the WD-40 Specialist Bicycle Dry Lube Spray to see if the problem abates.
Mountain Cycle Maintenance: Linkage and Cog Teeth Care
Regular cycling means the mountain cycle linkage and cog teeth will face eventual wear. To minimize this, consider these maintenance tips:
- Drivetrain Cleaning: Inspect the drivetrain for foreign substances, including grit, lubricants, or other contaminants that might stick in the gear teeth and shifting mechanism. A thorough wipe using a pristine cloth to remove most dirt followed by a suitable cleaning agent completes the cleaning process;
- Lubrication: It’s crucial to use cycling-specific lubricants that typically comprise a mineral oil foundation combined with added elements like Teflon or paraffin. After cleaning, spread a minimal layer of this lubricant on both linkage sides and allow absorption for a few minutes, later removing any surplus residue;
- Regular Checks: Periodic checks on connectors or fasteners of the drivetrain are essential. With time, these can loosen due to natural vibrations. Address any such looseness promptly to avoid gear jumps during rides.
Effective Cycle Linkage Installation and Upkeep
Setting up and preserving the cycle linkage can be achieved with minimal effort. Below are insights on achieving this:
- Installation: The initial step before placing a new linkage is confirming it’s suitable for the cycle model. Necessary tools for the process include an adjustable tool and a lubricating brush. Start by syncing the linkage ends at the shifting mechanism. Gradually secure every linkage segment until firmly held. Conclude by applying lubrication wherever metals contact;
- Preservation: Once the linkage is in place, consistent care is vital to ensure smooth operations. Periodic lubrication and post-ride inspections for any abnormalities like corrosion, fissures, or compromised gear teeth or linkage segments are crucial. Address any anomalies instantly to prevent escalation. Concurrently, ensure the firmness of all connectors to maintain stability.
Understanding the Shifting Mechanism Misalignment Causes
Issues with linkage jumping might arise from misaligned shifting mechanisms, compromised components, impurities, or improper tension:
- Compromised Components: Over time, cycling elements can deteriorate or malfunction, resulting in shifting mechanism dislocation and linkage jumps. Periodic checks for fraying or breaking cables and worn pulleys are essential, with replacements when deemed necessary;
- Impurities: Accumulation of contaminants on cycling elements can hamper efficient gear changes. A consistent cleaning regimen for the transmission is indispensable for its lubrication and optimal operations. Furthermore, address rust formations promptly to prevent significant damage to the shifting mechanism;
- Cable Tension Discrepancies: Linkage jumps post cable tensioning could indicate either overly slack or taut tensioning. If you’re uncertain about correct tensioning, seeking expert advice or consulting digital guidelines can provide detailed guidance.
Addressing Linkage Slippage with a Barrel Adjuster
The barrel adjuster, typically found on the derailleur, offers a straightforward solution to the issue of linkage slippage. This component, often metallic with a textured surface, provides a grip for adjustment.
To fine-tune, rotate the adjuster in a clockwise direction until linkage slippage ceases. In most instances, a mere one or two twists will achieve the desired tension, ensuring a seamless transition among the gears.
Should there remain any sensation of the linkage slipping during gear changes, make a minor additional rotation until the transition is smooth.
In Summary
Having provided insights on addressing linkage slippage concerns, it is hoped that the shared knowledge aids in effectively managing the problem.
It is desirable that the shared strategies alleviate related concerns. However, should the aforementioned strategies prove ineffective, the ultimate solution might necessitate acquiring a fresh linkage.
Frequently Asked Questions
Potential culprits include worn or mispositioned derailleur pulleys, aging or faulty gear-changing devices impacting the gear alignment, or compromised or misshapen teeth on specific cassette cogs. Additionally, the accumulation of contaminants on transmission components can lead to gear-shifting challenges, inclusive of linkage slippage.
Potential reasons encompass damaged and deteriorated derailleurs, bent drive wheel components, or compromised cassette drives. Excessive dirt and contaminants within the transmission components can also result in shifting anomalies and startup issues.
A feasible strategy is to manage the cable tension. To rectify such slippage, position the linkage in the smallest section of the rear cassette (most challenging gear) and either the middle or larger section on the shifting mechanism. Subsequently, operate the gear-changer once. If the linkage doesn’t transition to an elevated gear, it’s prudent to increase its tension.